Laravel は、MVCのWebアプリケーション開発用の無料・オープンソースで、PHPで書かれたWebアプリケーションフレームワークです。Vagrant上にセットアップした際のメモ。VirtualBoxに関しては特記していませんが、既にインストール済み前提での記載となります。
パッケージ一覧:
- Vagrant 2.0.2
- PHP 7.0.27
- nginx version: nginx/1.12.2
- mysqld Ver 5.6.39
1. Vagrantインストール
- ここから vagrantをダウンローしてインストール、インストールが終わったらターミナルを起動して、Vagrantの作業ディレクトリを作成。今回は、Vagrantの centos/7を利用。
MacBook-Pro:~ Tadashi$ mkdir ~/vagrant
MacBook-Pro:~ Tadashi$ cd vagrant
MacBook-Pro:~ Tadashi$ mkdir centos7
MacBook-Pro:~ Tadashi$ cd centos7
MacBook-Pro:~ Tadashi$ vagrant init centos/7
Vagrantを起動する前に一部設定ファイルを変更(IPアドレス、CPU数等)
MacBook-Pro:centos7_ph7cms Tadashi$ cat Vagrantfile
# -*- mode: ruby -*-
# vi: set ft=ruby :

# All Vagrant configuration is done below. The "2" in Vagrant.configure
# configures the configuration version (we support older styles for
# backwards compatibility). Please don't change it unless you know what
# you're doing.
Vagrant.configure("2") do |config|
  # The most common configuration options are documented and commented below.
  # For a complete reference, please see the online documentation at
  # https://docs.vagrantup.com.

  # Every Vagrant development environment requires a box. You can search for
  # boxes at https://vagrantcloud.com/search.
  config.vm.box = "centos/7"

  # Disable automatic box update checking. If you disable this, then
  # boxes will only be checked for updates when the user runs
  # `vagrant box outdated`. This is not recommended.
  # config.vm.box_check_update = false

  # Create a forwarded port mapping which allows access to a specific port
  # within the machine from a port on the host machine. In the example below,
  # accessing "localhost:8080" will access port 80 on the guest machine.
  # NOTE: This will enable public access to the opened port
  # config.vm.network "forwarded_port", guest: 80, host: 8080

  # Create a forwarded port mapping which allows access to a specific port
  # within the machine from a port on the host machine and only allow access
  # via 127.0.0.1 to disable public access
  # config.vm.network "forwarded_port", guest: 80, host: 8080, host_ip: "127.0.0.1"

  # Create a private network, which allows host-only access to the machine
  # using a specific IP.
  config.vm.network "private_network", ip: "192.168.33.10"

  # Create a public network, which generally matched to bridged network.
  # Bridged networks make the machine appear as another physical device on
  # your network.
  # config.vm.network "public_network"

  # Share an additional folder to the guest VM. The first argument is
  # the path on the host to the actual folder. The second argument is
  # the path on the guest to mount the folder. And the optional third
  # argument is a set of non-required options.
  # config.vm.synced_folder "../data", "/vagrant_data"

  # Provider-specific configuration so you can fine-tune various
  # backing providers for Vagrant. These expose provider-specific options.
  # Example for VirtualBox:
  #
  config.vm.provider "virtualbox" do |vb|
    vb.cpus = 2
  #   # Display the VirtualBox GUI when booting the machine
  #   vb.gui = true
  #
  #   # Customize the amount of memory on the VM:
  #   vb.memory = "1024"
  end
  #
  # View the documentation for the provider you are using for more
  # information on available options.

  # Enable provisioning with a shell script. Additional provisioners such as
  # Puppet, Chef, Ansible, Salt, and Docker are also available. Please see the
  # documentation for more information about their specific syntax and use.
  # config.vm.provision "shell", inline: <<-SHELL
  #   apt-get update
  #   apt-get install -y apache2
  # SHELL
end
MacBook-Pro:~ Tadashi$ vagrant up
MacBook-Pro:~ Tadashi$ vagrant ssh
2. PHP インストール
[vagrant@localhost ~]$ sudo su
[root@localhost vagrant]# yum install -y epel-release
[root@localhost vagrant]# rpm -Uvh http://rpms.famillecollet.com/enterprise/remi-release-7.rpm
[root@localhost vagrant]# yum -y install --enablerepo=remi,remi-php70 php php-devel php-mbstring php-pdo php-gd php-mysql php-xml php-fpm php-pecl-zip
3. Nginx インストール
[root@localhost vagrant]# yum install -y nginx
4. MySQL インストール
[root@localhost vagrant]# yum install -y http://dev.mysql.com/get/mysql-community-release-el7-5.noarch.rpm
[root@localhost vagrant]# yum --enablerepo=mysql56-community install -y mysql-community-server
5. php-fpm セットアップ
[root@localhost vagrant]# vi /etc/php-fpm.d/www.conf
user = nginx
group = nginx
listen = /var/run/php-fpm/php-fpm.sock
listen.owner = nginx
listen.group = nginx
[root@localhost vagrant]# chmod -R 777 /var/lib/php
[root@localhost vagrant]# systemctl start php-fpm.service
[root@localhost vagrant]# systemctl enable php-fpm.service
6. Nginx セットアップ
[root@localhost vagrant]# vi /etc/nginx/nginx.conf
    server {
        listen       80 default_server;
        listen       [::]:80 default_server;
        server_name  192.168.33.10;
        root         /usr/share/nginx/app/public;
        index        index.php;

        # Load configuration files for the default server block.
        include /etc/nginx/default.d/*.conf;

        location / {
	        try_files $uri $uri/ /index.php?$args;
	        index	index.php;
        }
        location ~ \.php$ {
                root           /usr/share/nginx/app/public;
                fastcgi_pass   unix:/var/run/php-fpm/php-fpm.sock;
                fastcgi_index  index.php;
                fastcgi_param  SCRIPT_FILENAME  $document_root/$fastcgi_script_name;
                include        fastcgi_params;
    	}
        location ~ /\.ht {
                deny  all;
    	}
[root@localhost vagrant]# systemctl start nginx
[root@localhost vagrant]# systemctl enable nginx
7. MySQL セットアップ及びデータベースの作成
[root@localhost vagrant]# systemctl start mysqld.service
[root@localhost vagrant]# systemctl enable mysqld.service
[root@localhost vagrant]# mysql_secure_installation
... パスワードはないので、リターンして新しいパスワードを入力する
[root@localhost vagrant]# mysql -u root -p
mysql> CREATE DATABASE laravel_db DEFAULT CHARACTER SET utf8 COLLATE utf8_general_ci;
mysql> quit
8. composer インストール
[root@localhost vagrant]# curl -sS https://getcomposer.org/installer | php -- --install-dir=/tmp
[root@localhost vagrant]# mv /tmp/composer.phar /usr/local/bin/composer
[root@localhost vagrant]# ln -s /usr/local/bin/composer /bin
[root@localhost vagrant]#
9. Laravel インストール
[root@localhost vagrant]# cd /usr/share/nginx/
[root@localhost nginx]# composer create-project laravel/laravel app --prefer-dist

[root@localhost nginx]# chown -R nginx:nginx app/
[root@localhost nginx]# sudo chmod 777 -R app/storage app/bootstrap/cache
[root@localhost nginx]# vi app/.env
DB_DATABASE=laravel_db
DB_USERNAME=root
DB_PASSWORD=password
10. System setup
[root@localhost html]# vi /etc/sysconfig/selinux
SELINUX=disabled
[root@localhost html]#
11. 再起動
[root@localhost html]# reboot
[root@localhost html]#
12. http://192.168.33.10 へアクセスするとトップページが表示されます。
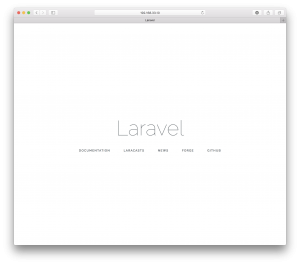
これでインストールは完了です。参考までに😉